Raspberry Jam – Low Sugar Version
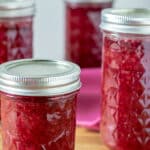


My favorite jam, as a child and now, is raspberry jam! This is a low sugar alternative to the brands with high fructose corn syrup, that you buy in the grocery store.

Honestly, is there ANYTHING better on the entire planet than a peanut butter and jelly sandwich with homemade raspberry jam? I think not! Seriously,…. I think not. 🙂
This raspberry jam has such a fresh flavor. It’s just like biting into a raspberry in the summer.
Canning gets a bad rap. It is so much easier than people are led to believe and the rewards are innumerable! Namely, homemade preserves all winter long!!
Can You Make Jam with Fresh and/ or Frozen Fruit?
Yes. Raspberry jam can be made with fresh or frozen berries.

What to do with raspberries, after picking
Raspberries are one of the fruits that have an extra short shelf life, when fresh. In fact, they probably have the shortest shelf life of any! If you are not making jam the day after the raspberries are picked, it is advisable to freeze them. Even if there is only a few days between picking and canning.

Freezing raspberries to extend shelf life
- Rinse raspberries in a colander and then allow to drain, for a few minutes.
- Place freezer paper, parchment, or waxed paper on a cookie sheet that has sides. Sprinkle raspberries on paper, separating them, so that they are not crowded. Freeze for a few hours, or overnight.

Remove from cookie sheets to freezer bags, and proceed with making jam when it’s convenient!

It is helpful to measure and label how many cups of berries you place in each bag, so that you have the proper amount for your batch of jam.

Don’t miss our complete step-by-step guide to canning.
What you need
- raspberries – fresh or frozen raspberries both work fine for this recipe
- water or fruit juice – use mild juice like apple or white grape
- sugar
- low sugar pectin

Preparing to make jam
Wash jars
If you have a dishwasher, that is the easiest way to clean jars. If not, wash in hot, soapy water and rinse well, with very hot water.
UPDATE; According to new recommendations, jars do not need to be sterilized if processing time is ten minutes or longer. Jars should still be hot before adding the hot jam.
I just add clean jars to the canning pot when bringing the water up to temperature before processing. This can take up to 45 minutes so start heating the water in your pot first!
How to sterilize jars for canning
Sterilizing jars in the dishwasher
Some sites, like Spruce Eats, suggest the dishwasher is enough to sterilize the jars. The jars must still be very hot from the dishwasher’s drying process when filled. I also feel that it solely depends on your hot water heaters’ settings and if you have a dishwasher with a temperature booster. Some places have hot water heaters turned down, especially those homes with small children. It is worth the extra effort, to keep your family safe, and use an alternate sterilization technique!
Sterilizing jars in water bath canning pot
If you have the canning pot out anyway, that is the easiest way to sterilize the jars. Take jars directly from the dishwasher, or hand washed, to a water bath canning pot. Fill pot to 1-2 inches above the top of jars. If you use hot water to fill the pot, it will take less time to come to a boil.
New canning pots are available from local and online retailers. (Link below) Used canning pots are readily available at garage sales and on Craigslist for peanuts.
Bring the canning pot to a boil on your biggest burner and boil jars for about 10-15 minutes to sterilize.
Sterilizing jars in microwave
Jars can be sterilzed in the microwave, as well. After washing and rinsing jar, (leave the jar wet), place in microwave on high power for 1 minute. Fill immediatelly, before jar has a chance to cool.
**IMPORTANT!!** DO NOT use the microwave method for sterilizing jars with any metal on them, or with metal lids or bands screwed on to jar!
Sterilizing jars in the oven
Jars can be sterilized in the oven for 20 minutes at 275°F. I have personally only used this method once. If you are doing small batches, why heat the house up with the oven? You already have to have the canning pot going. It makes no sense to me.
How to prepare jars and lids
- Add lids to small bowl or pot. Pour boiling over lids. Allow to sit in hot water, until ready to use.
- Place jars in water bath canning pot, cover with water. Start the water to get it hot for processing.

How to make raspberry jam
If not using frozen raspberries, sort and rinse raspberries in a colander.
- Place raspberries and water in large pot.
- Mash with potato masher. If you want seedless jam, squeeze juice through sieve or cheesecloth. You can also use a commercial juicer or an attachment for your Kitchenaid.
- Measure sugar and pectin and put in bowl. Mix well. (This steps helps keep the pectin from clumping.) I make low sugar jams, if you choose to make low sugar, use low sugar pectin!
- Measure additional sugar.
- Bring raspberries to a full rolling boil, one that can’t be stirred down. Add pectin/ sugar mixture.
- Bring that mixture to a full rolling boil, then add the rest of the sugar, all at once.

- Don’t worry if it foams up. If there is foam left, you can skim it off but most of the time, the foam disappears after the cooking process is complete. You can add 1 Tbsp. butter or margarine to deter the mixture from foaming but read on to avoid the extra fat and calories. Bring back to boil. Boil for one full minute. Turn off heat and keep stirring for a minute, or so. (This will stir the foam down.)
- Pour jam into hot jars, leaving 1/2″ headspace, using a jar funnel, if you have one.
- Wipe edges with a damp paper towel to remove any residue.
- Place lids on jars. Tighten band to fingertip tight.

Place the jars in a water bath canning pot and process (low boil) for 10 minutes. Increase processing time if you are over 1000 feet elevation. Turn off heat and let the jars sit in the hot water for another 5 minutes.
Remove jars to counter. You will hear the jars pop. This means they are sealed. Let them sit for 24 hours without disturbing to ensure the jam jells. After 24 hours check for seal. (Lid does not flex up and down when center is pressed.) If lid flexes the jam should be stored in the refrigerator.
For more information on canning practices, see our Canning Made Easy article. Step by step photos and lots of additional information.

Homemade jams should be stored in a cool dark place, like a basement. They last for approximately one year, before they are opened.
Once opened, store in refrigerator. Jams are best if used within a couple months, after opening. Mine never have lasted that long, so it’s hard to give an exact time.
How to use this raspberry jam
Serve jam on toast, French toast, pancakes, English muffins, and the like. Jams are also great for a topping for ice cream, yogurt and pudding.
Other delicious homemade jams
Love Gardening? If you love growing your own produce, these posts are packed full of information about how to get that big harvest by the end of the season! Don’t miss How to Start a Garden Series! The first part is Planning Your Garden!
Second is Preparing the Garden Site.
The third is Choosing Plants and Planting Your Garden.
The fourth is Garden Maintenance, and the last is Harvesting a Garden and Preserving the Harvest, this post has over 100 FREE recipes for preserving your harvest!
Tools I use
Contains affiliate links, for full disclosure, see FTC Disclosure, here.
This Low Sugar Raspberry Jam is easy and delicious. Make your own today!
Connect with us through our social media pages! Facebook, Instagram, Pinterest, Twitter.
Please ask any questions or share your comments in the comments section below. We’d love to hear from you.
I hope you enjoyed the recipe today.
Enjoy. And have fun cooking!


Raspberry Jam
Ingredients
- 1 1/3 c prepared fruit (about 1 pint fresh raspberries)
- 1/3 c water
- 1 1/2 Tbsp Low Sugar Pectin
- 1/2 c up to 1/2 c. sugar You can use 0 to 1/2 cup, of added sugar.
Instructions
- Prepare jars. Wash in hot soapy water and rinse thoroughly. Place directly in water bath canning pot. Cover clean jars with water about 2 inches above jars. UPDATE: Jars do not have sterilized anymore for this recipe. They should just be hot.
- Place washed lids in a small saucepan and cover with boiling water. Let sit until ready to use. I also add my ladle and funnel to this pot to sterilize them. Sort, and rinse raspberries. Crush with potato masher. Add to 8 qt. sauce pan. Add water.
- Measure sugar and pectin. Add a few tablespoons of sugar to pectin.
- Bring raspberries to a boil and add pectin/ sugar mixture. Again bring to full boil (one that can’t be stirred down).
- Add the rest of sugar all at once. Bring to a full boil and boil for 1 full minute.
- Fill jars with hot jam.
- Wipe rim of jars with clean, wet paper towel and place lid on. Add band and tighten to fingertip tight.
- Place filled jars into canning pot and bring to boil. Low boil for 10 minutes.
- Turn off heat and allow to sit in water for 5 minutes.
- Check lids by pushing down in center. If lids flex up and down, the jar is not sealed and should be refrigerated.
- Jars that have sealed should be stored in a cool place for a year. (If it lasts that long!)
- This recipe makes 2 half pint jars jam.

Video
Notes
Nutrition
Originally Published 8/1/2016


I have made this each year for the past four years and it always comes out well. I do 5X the recipe and it sets up quickly. Also add 1 table spoon of lemon juice primarily because it brings out the flavors of the berries. Nice to have a recipe that does not involve huge amounts of sugar,
We’re so glad that you like it, Dave! Thanks for the vote!
Ok so I made this but out I’m 1/4 pint jars and it came out really thick? What did I do wrong?
It’s common when canning jams and jellies not to come up with exact amount stated in the recipe. There are many factors. You may have cooked it a bit too long and the natural water in the raspberries. Are the two most common. It should still taste great!
Are there different cooking time if I use frozen berries?
Nope! They will thaw very quickly once you put them on the heat. Thanks for checking out the recipe Anne!
It sounds delicious! But I’m confused. The recipe says “1/2 c up to 1/2 c. sugar”. How much sugar do I use? 1/2 plus maybe ANOTHER half cup or just 1/2 cup total?
I changed the recipe. You can use zero to 1/2 cup of added sugar. In other words, you don’t have to add any sugar, if you want. I usually do over 1/4 cup but under 1/2 cup. The choice is yours. Thanks for your question Tiffany!
Thanks!
Any time!!
Are you able to use liquid pectin?
You can always substitute liquid pectin. Thanks for checking out the recipe!
I just made 8 batches. It made 5.5 pints. It’s Delicious! Thank you for the recipe, it’s definitely a keeper!
I’m so glad that you like it! Where did you get the raspberries this time of year? I wish I had some! Thank you Charissa!
Trying this today. Can I double the batch when preparing?
Oh, absolutely! You can do as many as your canning pot will hold, usually up to about 10 half pint jars! Let me know how you like it! Thanks, Karen!
I wish I had all those fruits to can. Great tutorial, I will now go looking for a water bath canning pot hoping one day my garden produce will be enough for canning.
There’s a link to one on Amazon! You should be able to find there fairly cheap! Thanks, Laura! I hope your garden will produce lots!
MMM homemade jam tastes so much better than shop bought and you have the satisfaction of making it yourself!
It really is remarkable how much tastier it is, isn’t it Bintu?