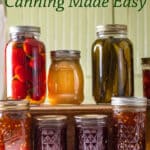
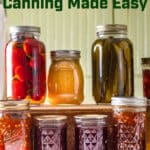
Step by Step Easy Canning Tutorial

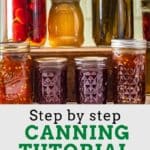
Learning how to can your food is a great skill. This complete tutorial will walk you through easy canning step by step.

The domain of our grandmothers was at home canning in the kitchen. They preserved everything they possibly could to get their families through the long cold winters.
There has been a large resurgence of interest in canning. Recently you were hard-pressed to find a canning jar or lid on the shelves.
The thing that most folks don’t realize is that canning your own foods is WAY easier than you think. With a few tidbits of knowledge, you, too, can be a pro.
Our grandmothers had it much harder than we do. They had old-fashioned canning jars with glass lids and rubbers and, many times, had to melt wax to pour over the food so that bacteria could not enter. Not to mention they had no running water and old stoves.

It’s a great way to make sure you have access to fresh, healthy food all year round, especially if you’re growing your own produce or buying in bulk. In this tutorial, we will go through the basics of canning, including the equipment you need, the different types of canning methods, and the steps involved in canning food safely and effectively.
We will start by discussing the different types of canning and the foods that are best suited to each method. We will also cover the equipment you need for canning, including all of the tools.
Once we’ve covered the basics, we will walk you through the steps of canning, including preparing the food, filling the jars, and processing them safely. We will also discuss how to troubleshoot common issues that can arise during the canning process.
By the end of this tutorial, you’ll have a good understanding of the canning process and be able to start canning your own food at home. So let’s get started!
What exactly is canning?
The process of canning has been done for many hundreds of years but has become vastly safer and easier the more that experts learn and pass on to us.
The purpose of canning is to preserve food for a longer period of time by creating an airtight seal in a container. Canning involves heating food in a container (such as a jar or a can) to a high temperature.
This process kills any bacteria or microorganisms, such as the spores of clostridium botulinum, that may cause spoilage. Botulinum is a deadly toxin that could cause illness, or even death. Once the food is heated and the container is sealed, it creates a vacuum seal that prevents any further contamination from outside sources.
It will extend the shelf life of food by months or even years, making it easier to store and transport. Canning is a common method used to preserve fruits, vegetables, meats, and other types of food.

Different types of canning
There are two different types of canning. The method you choose will be determined by the acidity of the food itself.
Water bath canning
Water bath canning is performed, as the name implies, in boiling water to kill microorganisms, toxins, molds, or yeast. This method is great for high-acid foods. These include berries, peaches, tomatoes, and others. These foods have a high acidity (pH of below 4.6). Many of these will still need an added acid (usually lemon juice, citric acid, or vinegar).
Foods that are good for water bath canning
- jams, jellies, and fruit butters
- pickles
- tomatoes; such as tomato sauce
- salsas
- vinegars
- relish
- some condiments

Pressure canning
Pressure canning is done in a special pot that is made specifically for canning. A pressure canner is used for foods that have low acidity (above pH 4.6). It has the ability to heat the foods in the jar to 240°F, rather than the 212°F that the water bath gets to.
**IMPORTANT** DO NOT mistake your Instant Pot pressure cooker for a pressure canner! They are two different tools!
Foods that are better to pressure can
- Soups
- Stews
- Pumpkin, beets, green beans, squash, carrots, asparagus, potatoes, corn, legumes, or other low-acid vegetables.
- Meats such as poultry, beef, pork, fish and seafood, and game meats. (venison, elk, antelope, moose, etc.)
Pressure canning is not any more difficult than water-bath canning but does require the purchase of a pressure canner.

Pro Tip** If your garden is producing more than you can keep up with, freeze your produce first. Many foods can be frozen first then canned. For more information on freezing, see here.
Step-by-step water bath canning procedure
Step One
Before anything else, you should get your water bath canner on to boil. Fill it about halfway for pints and 2/3 full for quarts.

Step Two
Sterilize jars. There are 4 different methods to do this. NOTE: If process time (0-1000 ft elevation) is over 10 minutes, this step can be eliminated according to the National Center for Food Preservation. Lids should be washed in hot, soapy water. Then placed in simmering water. Do not boil.

There are 4 ways to sterilize jars.
- Use the dishwasher on sterilize setting.
- Set jars in boiling water for about 10 minutes; this can be done right in your canner.
- Microwave jars on high for 1 minute. Use a wet jar for this method.
- Place jars in 275° oven for about 20 minutes.
Step Three – Always rinse or wash produce.
Step Four
Follow the recipe exactly as it is written. Do not adjust the acid to produce a lower acidity ratio or sugar to produce a lesser ratio for jams and jellies. Recipes for low-sugar jams and jellies are available, but use a recipe that has been written specifically for low-sugar.

Step Five
When the recipe is complete, load hot food into hot jars using a ladle and a wide-mouth canning funnel (purchased with canning tools).

Step Six
Be sure to leave proper headspace (the space between the top of the preserves and the top of the jar). Headspace size should be included in any recipe you use.

Step Seven
Use a knife, chopstick, or bubble-removing tool (from the canning tool set you purchase) to remove any air bubbles along the outside edge of the jar.

Step Eight
Wipe the top edge of the jar clean with a damp towel.

Step Nine
Apply the warm lid so that the sealing compound is centered on the jar. If it’s not, the jar may not seal.

Step Ten
Screw on the bands fingertip tight. Do not over-tighten.

Step Eleven
Carefully lift jars into boiling water with jar lifter. Be careful that you don’t have too much water in the pot or it will spill over. Jars should have one inch of water covering them.

Step Twelve – Set a timer and process for the correct processing time, according to the recipe. Be sure to check your altitude and adjust the time according to the recipe.
Step Thirteen – After processing for the specified time, turn the fire off under the pot (for a gas stove) or remove it from the burner (electric stoves). Remove the lid of the canning pot. Allow jars to sit in hot water for about 5-10 minutes to cool slowly. (This will prevent siphoning – when liquid is squeezed out of jars, even if they are sealed.)
Step Fourteen – After resting, remove jars with canning tongs and place them on a kitchen towel. Allow them to remain undisturbed for at least 12 hours. You may hear some pinging from the jars. This is music to a canner’s ears. It means your jars are sealing.
Step Fifteen – After 12 hours, check jars for seal. Push the center of the lid with your finger. If the lid does not flex up and down, it is safely sealed. Next, to be positive on a good seal, remove the band and gently try to remove the lid with your fingertips. If the lid is secure, it is definitely sealed. If the lid flexes, the jar did not seal. It can be reprocessed again to try to get a seal (with new lids), or the jar can be stored in the refrigerator. Use unsealed jars first.
Step Sixteen – Label jars and date them. Store in a cool, dry place out of direct sunlight for about a year. Many preserves will last longer, but it’s best to try and use them in a year.

Step-by-step pressure canning procedure
Step One
Wash vegetables. Peel them if the recipe calls for peeling.

Step Two
Prepare jars. Add salt to each jar if the recipe states. (optional step)

Step Three
Some low-acid foods require par cooking. This is called hot pack. If your recipe specifies hot pack then par-cook according to recipe instructions.
Fill jars, leaving specified headspace. The use of a canning funnel will help keep the edge of the jar from getting debris on it.

Step Four
In some cases, you will add clean, boiled water, broth, or other liquid to the jar, leaving the headspace.

Step Five
Remove air bubbles with a bubble tool, knife, or chopstick.

Step Six
Wipe the jar rim with a damp, clean towel.

Step Seven
Center the lid on the jar. Screw on bands fingertip tight.

Step Eight
Prepare pressure canner, adding water to the bottom line. Use the manufacturer’s instructions.
Add jars to the canner. Lock lid.

Step Nine- Turn the fire on high and vent the pressure canner for ten minutes.
Step Ten- Then, add the weighted or dial gauge pressure regulator. Bring the pressure up to the specified pressure (psi) and maintain it there.
Step Eleven- Process for the specified times as per the recipe instructions, adjusting for altitude. Always set a timer.
Step Twelve- Keep an eye on your pressure and make sure that you do not drop below the specified pressure at any time during the canning process. If your pressure drops below the correct pressure, restart your timer.
Why does elevation matter?
The easiest answer is that at higher elevations, water boils at a higher temperature; therefore, so will the liquids that you are canning. Be sure that if you live above 1000 feet above sea level, you adjust your processing time by the specified amount! It is crucial to food safety.
How will you know if your food has gone bad?
The bottom line is to use your senses.
- Sight – If food color looks very “off,” or you can actually see mold. Is the lid bulging or rusting? It’s best to throw it out.
- Smell – Once the lid is removed, does the food smell “off” or not like it should?
- Taste – After checking the lid and using your other senses to look at the food and smell it, taste just a tiny bit. Does it taste off? Do the sight and smell test first. If you answered yes to either of those questions, DO NOT taste it.
A common mantra among food experts and canners is, “When in doubt, throw it out”. It is not worth getting yourself or your family ill. Botulism poisoning is still a serious threat to humans and is nothing to fool around with.

Why should you learn how to can at home?
If 2020 taught us anything, it’s that food supplies can be affected almost overnight in the case of emergencies (including upstate NY snow storms). No yeast, no fresh vegetables, no bread, no canned goods, no paper towels, or toilet tissue. It was a bit disconcerting.
Did we panic? Absolutely not. The pantry shelves of our basement are teeming with lots of farm-fresh goodness. Jams, jellies, pickles, salsas, sauces. You name it.
Did it take a lot of time to can it all? No, not really. If we found something on sale at a farmer’s market or the garden gave us bushels of tomatoes, we would can one batch at a time.
When you make foods shelf stable, you can also save room in your freezers too.
The other bonus to canning your own foods at home is you reduce food waste, and you can save yourself a whole lot of money.
Pro Tips for successful canning
- Use the freshest produce possible for canning for the best flavor.
- Always use clean tools and jars. Use new lids every time. Lids are single-use only.
- Heat water in the water bath first. It can take up to 45 minutes to boil.
- Prepare and measure all of your ingredients before starting the recipe. Prepare all of the tools you will need.
- Process for the allotted time the recipe calls for. Adjust for elevation.
- Always choose recipes from a trusted source. Home food preservation is more of a science and must be completed properly to avoid the risk of contamination of the foods and make them shelf stable. Sites like USDA complete guide to canning, National center or home food preservation, and extension services are the sources that we base all of our recipes on.
- Want to do a huge batch so that it will last longer? If you buy a canner steamer rack, you can make 2 layers in your canning pot and do twice as much at one time. Most home canners will hold 18 pints. This is true for both types of canning. Do not do large batches of jams that require the use of pectin or they will not set properly.

What you need
- Water bath canning pot
- Pressure canner
- Canning tool set
- quart canning jars
- pint jars
- half pint jars
- chef’s knife
- paring knife
- extra large bamboo cutting board
Additional useful tools
Do you need all of these specialty tools to get started? Absolutely not. You just need a large pot and jars and lids. Although, a canning tool set is immensely handy and may save you from lots of burns.
NOTE* If using a standard large pot, you will need something to keep jars from bouncing onto the bottom of the pot. There are many things that can work. a trivet, a kitchen towel, a round cake cooling rack, etc. Jars can also be wrapped in clean rags or kitchen towels to protect them from bouncing up against each other.

Want to learn how to grow your own produce for canning? If you love growing your own produce, these posts are packed full of information about how to get that big harvest by the end of the season! Don’t miss our How to Start a Garden Series!
The first section is Planning Your Garden. Second is Preparing the Garden Site.
The third is Choosing Plants and Planting Your Garden. The fourth is Garden Maintenance.
The last is Harvesting a Garden and Preserving the Harvest, this article has over 100 FREE recipes for preserving your harvest!
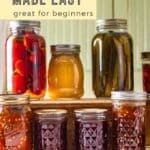
Great canning recipes for beginners
- Cranberry pepper jelly
- Canning applesauce
- Jalapeño jelly
- Tomato Sauce
- Canning cherry pie filling
- Tomato Juice
- Whole Tomatoes
- Canning potatoes
- Can water for emergencies
- Canning Chickpeas


Canning Foods at Home Made Easy
Ingredients
For jams and jellies (water bath canning)
- 1 Water Bath Canning Pot
- sugar
- fruit
- Ball RealFruit™ Low or No-Sugar Pectin
- Bottled Lemon Juice
- canning jars, lids and bands
Low acid foods (pressure canning)
- 1 pressure canner
- salt
- ascorbic acid
- canning jars, lids and bands
Instructions
For jams and jellies (water bath canning)
- Heat water in canning pot.1 Water Bath Canning Pot
- Heat jars and lids.canning jars, lids and bands
- Prepare fruit.sugar, fruit, Ball RealFruit™ Low or No-Sugar Pectin, Bottled Lemon Juice
- Execute steps as per recipe instructions.
- Ladle hot jam into hot jars leaving suggested head space.
- Remove bubbles with knife, chop stick or bubble tool.
- Wipe rim of jar with damp cloth.
- Affix lids in center of jar.
- Tighten bands but not too tight.
Low acid foods (pressure canning)
- Prepare vegetables, beans, meat etc. according to recipe. Add ascorbic acid, if recipe calls for it.ascorbic acid
- Add to jars salt, if using.salt
- Pack food into jar. Remove air bubbles.canning jars, lids and bands
- Wipe rim of jar with a damp cloth.
- Apply lids to center of jar.
- Tighten bands fingertip tight.
- Add jars to pressure canner. Turn burner on high and vent for ten minutes.1 pressure canner
- Add weighted or dial gauge pressure regulator. Bring it to the pressure (psi) that the recipe calls for.
- If your pressures drops below the correct pressure, restart your timer.
- Keep an eye on your pressure and make sure that you do not drop below the specified pressure at any time during the canning process. If your pressures drops below the correct pressure, restart your timer.


All your posts are inspiring. Though, canning has always seemed daunting to me. You took the hesitance away by such a thorough tutorial. Thank you.
Thank you so much Laurie! I so appreciate your comment and hope that I have helped take a bit of the fear out of canning. It is really fun and easy!