Canning Venison | Canning Deer Meat

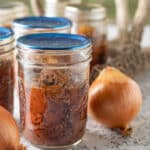
Canning deer meat at home is incredibly easy and the flavor just can’t be beat! You can simply raw-pack venison with only two ingredients.

That is it. No kidding. Just two ingredients. Venison and salt. No water or broth. They can in their own juice. You can really can any domestic or wild meat. Beef, elk, pork or even poultry.
Why Can Deer Meat?
If your family is like ours, your freezers will be filled to the point of bursting by January. We literally have three freezers, and every single one of them is packed to the brim.
Canning venison is the perfect way to give your freezers a break. The meat is shelf-stable and ready to whip up a great-tasting dinner in no time flat.
Canning meat is incredibly easy, but you do need a specialized pressure canner. Although our grandmothers may have canned meat with water bath canning pots, we now know this practice is unsafe! Meats have low acidity levels, so the extra heat that the pressure canners produce will save your family from the possibility of foodborne illnesses like botulism.

Meat can be raw-packed or hot-packed. Raw-pack will sometimes not produce enough juice to cover all of the meat if it’s very lean.
Hot-pack canning must be used if adding any other additional ingredients like vegetables.
Ingredients for Raw-pack Canning Venison
- Venison: cleaned, rinsed and trimmed of fat and cartilage.
- Salt: Teaspoon of canning salt per quart jar. Do not use table salt!

Step by Step Instructions
- Prepare jars, lids, and pressure canning pot according to the manufacturer’s instructions.
- Trim venison well of all fat and cartilage or any damaged meat.
- Cut into chunks, cubes, strips or slices.
- Pack the meat into hot jars. Use a plastic or wooden spoon or chopstick to remove some of the larger air holes in the jar. You won’t be able to remove them all, but try to eliminate the larger ones. Leave a 1-inch headspace. (the space between the meat and the rim of the jar.)
- Add salt. (Some people add two teaspoons per quart, but we prefer less salt.)
- Wipe the jar rim with a damp paper towel or clean, damp cloth.
- Apply lids. Attach bands tightening just fingertip tight.
Add jars to pressure canner. Attach lid. Turn burner on medium high. Once it comes to boil, the pot will release steam. Let it vent for 10 minutes.
Add weighted gauge or dial gauge. When gauge comes to proper psi (pounds per square inch), for your elevation above sea level, begin your timer.
You must keep the pressure at this level for the entire time. If pressure ever drops below the specified pressure, begin timer again.
For pressure and times at specific altitudes, see chart in recipe notes below.

Optional Ingredients to Add
Do Not add additional ingredients to raw-pack venison. You must use hot-pack method.
- Onion: Diced onion is a good addition. It will save you from adding onion when making your final dish.
- Garlic: Garlic gives the meat a delicious flavor.
- Bell peppers: Easily make a stir-fry with bell peppers added to the meat. It also makes great hoagies and quick gravy to pour over mashed potatoes.
- Freshly cracked black pepper: Pepper gives the meat a good flavor.
How to hot pack deer meat
Venison can actually be hot pack pressure canned as well. It is not really more difficult but does result in extra dirty dishes that you need to clean up. I generally choose to raw pack just because it is so easy. Canning stews, soups, spaghetti sauce and more will save you lots of time on a busy night.
- Add some olive oil to a cast iron skillet.
- Add chunks, cubes, strips or slices of venison.
- Brown venison on all sides.
- Pack browned venison into hot jars.
- Add tomato juice, venison stock or water to the pan that you browned the meat in. Scrape the meat drippings and heat the liquid. Fill jar with the hot liquid, leaving 1-inch headspace. (the space between the meat with the liquid and the rim of the jar.)
- Add salt. (some people add two teaspoons per quart but we prefer less salty.)
- Wipe jar rim with a damp paper towel or clean, damp cloth.
- Apply lids. Attach bands tightening just fingertip tight.
Add jars to pressure canner. Attach lid. Turn burner on medium high. Let pot release steam for 10 minutes.
Add weighted gauge or dial gauge. When gauge comes to proper psi (pounds per square inch), for your elevation above sea level, begin your timer. Maintain the proper psi throughout the entire process. If at any time you drop below the target psi, you must start the timer again.
For pressure and times at specific altitudes, see chart in recipe notes below.

What cuts of venison should you can?
Back and front leg cuts such as the sirloin, top round, bottom round and shoulder are your best choices. To find out where they are on the deer, see Cuts of venison and how to use them.
How to use canned venison
There are innumerable ways to use the venison you have canned for a quick dinner. Use your imagination and come up with some delicious recipes. Let me know what you come up with!
- Make a quick stroganoff with sautéed onion, celery, carrot and mushrooms. Add venison. Pour cream of mushroom soup over all. Serve with rice, noodles or spätzle.
- Make a quick soup with various vegetables (canned or frozen veggies work well), add venison and venison stock.
- Make a curry with vegetables and curry powder. Thicken with cornstarch mixed with water. Serve over rice.
- Use it for “pulled deer meat” add BBQ sauce and make BBQ sandwiches.
- Tacos, enchiladas or taquitos. Add cumin, chili powder and garlic or use taco seasoning. Add canned tomatoes. Heat through. Serve with warm tortillas and toppings.
- Make sloppy joes with sloppy joe sauce or make your own sauce.
- Make southern venison and biscuits with a sausage gravy.
- You can do a quick stew with vegetables and deer meat.
- Quick chili is a good option with beans, onions and tomato sauce with chili spices.
Want to learn more about mastering venison cooking? Don’t miss our Ultimate Guide to Cooking Venison. Complete with over 70 recipes!
If you need help identifying which cut you are using, see our Identifying Venison Cuts article. It will give you lots of ideas on how to cook each piece of meat.
What to serve with canned venison?
- mashed potatoes
- cooked noodles
- pasta
- spätzle
- glazed carrots
- parsnips
More delicious venison recipes
- Grilled venison backstraps
- Chicken fried venison
- Venison enchiladas
- Corned venison
- Braised venison shanks
- Venison chorizo
- Venison Italian sausage
What Tools You Need
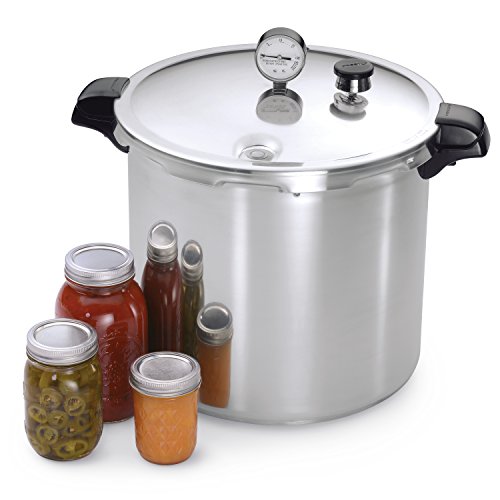
Use this for safely canning low-acid foods like meats, beans, and vegetables. A must-have for pressure canning anything that can’t go in a water bath.

Perfect for soups, sauces, stocks, and big-batch canning, these quart-sized Mason jars are a pantry staple that help keep homemade food fresh and organized. Durable glass construction makes them great for water bath or pressure canning, meal prep, dry storage, and even freezer-friendly use.

Canning venison is an easy project and a great way to preserve your harvest without taking up freezer space!


Canning Deer Meat
Ingredients
- 6 pounds Venison stew meat
- 1 teaspoon Kosher Salt
Instructions
- Prepare jars, lids and pressure canning pot, according to manufacturer's directions.
- Trim venison well of all fat and cartilage, or any damaged meat.6 pounds Venison stew meat
- Cut into chunks, cubes, strips or slices.
Cold pack canned venison
- Pack meat into hot jars. Use a plastic or wooden spoon or chopstick to remove some of the larger air holes in the jar. You won’t be able to remove them all but try to eliminate the larger ones. Leave a 1-inch headspace. (the space between the meat and the rim of the jar.)
- Add salt. (some people add two teaspoons per quart but we prefer less salty.)1 teaspoon Kosher Salt
- Wipe jar rim with a damp paper towel or clean, damp cloth.
- Apply lids. Attach bands tightening just fingertip tight.
- Add jars to pressure canner. Attach lid. Turn burner on medium high. Let pot release steam for 10 minutes.
- Add weighted gauge or dial gauge. When gauge comes to proper psi (pounds per square inch), for your elevation above sea level, begin your timer.
- For pressure and times at specific altitudes, see chart in recipe notes below.
How pack canned venison
- Complete steps 1,2 and 3.
- Place venison in a skillet with a bit of olive oil and brown on all sides.
- Pack hot meat into jars.
- Add venison stock, tomato juice or water to the pan you browned the venison in. Scrape up all of the browned bits from the pan.
- Pour the hot liquid over the meat, leaving the 1-inch headspace. (the space between the top of the product and the rim of the jar.)
- Remove air bubbles with plastic or metal tool.
- Continue with step 5 above.


Notes
Nutrition
Originally published January 20, 2022.


We have always soaked venison to get the blood out and remove some of the “games” taste. Do I need to add liquid after this is done?
Are you doing hotpack?
Thanks for the direction
Thanks!
We are going to can venison this year. I’m 3-4k’ above sea level. I saw it’s 13# but never saw how long I need to hold that pressure in my canner. Did I overlook it? If not can u plz advise how long it is pressured? Thank you, Ruth
It’s above, in the notes. 1 hour 15 minutes for pints. 1 hour 30 minutes for quarts.
I’ve only canned venison once – it was incredibly dry. Raw pack, can’t work out what went wrong – but a long way off the juicy, tender meat people tend to talk about. Any thoughts?
Gosh, ours has always been incredibly tender. Did you process a buck? Sometimes they are less tender and drier than does.
Do you put water in the canner? I didn’t see it anywhere. Or did I just miss it. Thank you.
Yes. Add water to the bottom line. Follow manufacturer’s directions to set up the canning pot.