Fermenting Peppers Made Simple


Fermenting peppers is an easy way to lock in heat and build a tangy, complex flavor you do not get with fresh peppers. Use this updated guide for exact salt ratios, two safe methods, and clear timelines for a short ferment and a long ferment. You will also find storage tips, flavor ideas, and troubleshooting so your jars turn out right.

You can make hot sauce with fresh peppers. Fermented peppers make hot sauce taste richer and rounder. See my guide to Fermented Hot Sauce for the finishing steps.
Why ferment peppers
Fermentation develops acidity and umami while keeping bright pepper character. The result tastes deeper than fresh or quick pickled peppers. Fermented jars store well under refrigeration when handled cleanly.
Ways to use fermented peppers
- Blend into hot sauce
- Spoon over eggs, tacos, bowls, and sandwiches
- Stir into salsas, soups, stews, and marinades
- Chop and fold into crema, mayo, or butter
Best peppers for fermentation
- Use fresh, firm peppers without soft spots
- Avoid prewashed bagged peppers that list washing or preservatives
- Great choices include jalapeño, serrano, hot banana, Hungarian wax, Fresno, and cayenne
- Very hot peppers like habanero and Scotch bonnet also ferment well when salt and cleanliness are on point
- Mixing varieties makes a mash with more depth
Salt and time that work
Salt controls which microbes thrive and helps texture. Weigh for accuracy.
- Use 2 to 3 percent salt by weight for a faster, brighter ferment with more monitoring
- Use 3.5 to 5 percent for a slower ferment with a firmer bite
- Dry salting uses pepper weight for the math
- Brining uses water weight for the math
Typical timelines
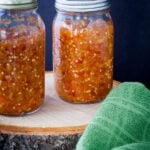
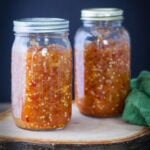
- Short ferment window is about 3 to 5 weeks. Flavor is complex and lively
- Long ferment window is 2 to 12 months. Flavor gets deeper and rounder over time
Taste weekly after week two. When the flavor is where you like it, move the jar to the refrigerator to slow further change.

History of Lacto-Fermenting
Fermenting peppers with a salt brine allows the peppers to ferment in their own juices. This intensifies the flavor of your finished product. Humans have employed this method for thousands of years.
Lacto fermentation was used to preserve vegetables that would otherwise spoil. These vegetables sustained families through barren months throughout the year.
Fermentation was traditionally done in large crocks, so that larger quantities of fresh produce could be preserved. This technique was used for kimchis, pickles and sauerkraut.
Ingredients Needed
- A mixture of hot peppers
- Salt
- For brine only, non-chlorinated water
Flavor Variations
- Garlic
- Onions
- Herbs (Dill, Cilantro, Oregano)
- Smoke or Roast the Peppers First
Choose Your Method
Dry salting is best for mashed or finely chopped peppers. Brining is best for slices or chunks.
Short Ferment vs Long Ferment
Short ferment. Keep the jar at cool room temperature in the 68 to 75°F range. Burp daily at first if using solid lids. Flavor builds in 3 to 5 weeks. Move to the refrigerator when you like the taste. Use within about 12 months for best flavor and texture.
Long ferment. Keep the same temperature range and keep peppers fully submerged. Switch to an airlock-style lid or loosen the lid slightly to vent. Check the surface weekly. Mature flavor builds over 2 to 12 months. For mash that will become hot sauce, long aging adds roundness and lowers sharpness
How to Ferment Peppers Step-by-Step Dry Salting Method
A pepper mash or finely chopped peppers are fermented with this method.

Wash peppers. Remove the stems. Place in a food processor or blender container. Wear gloves.

Finely grind.

Place the pepper mash in a large bowl.

Weigh the pepper mash. Multiply by your salt percentage. Example: 1,000 grams of peppers at 2.5 percent salt equals 25 grams of salt

Pack peppers and salt into a quart or a half-gallon mason jar. Pushing down to remove air pockets. Leave a 1-inch headspace.
- Weigh the mash with fermenting weights so the surface stays below its juices.
- Close with an airlock lid or close loosely. Set the jar on a tray in case of overflow.
- Burp once per day for the first week if using a solid lid. Then burp weekly.
- Ferment 3 to 5 weeks for a short ferment or continue aging for a long ferment.
- Refrigerate when the flavor is right for you.
How to Ferment Peppers Step-by-Step Brine Method
Brining the peppers is done when you’d like to ferment chopped or sliced peppers. The brine made with water will ensure the peppers are submerged in the salt mixture.
- Wash peppers. Remove the stem. Chop, slice or chunk the peppers.
- Make the brine: Combine distilled water and the salt. Stir until the salt has dissolved. Use 2-3 percent salt by water weight. Example: 1 liter of water at 2.5 percent salt equals 25 grams of salt.
- Pack the peppers into clean, sterilized jars.
- Cover with the brine.
- Weigh the peppers down with weights. Ensure they are covered with brine.
- Burp the peppers daily for about one week. Then burp them weekly or use an airlock.
- Let them ferment for about 4 weeks or longer for a long ferment.
- Refrigerate the jars once you’ve achieved your desired flavor.

Troubleshooting Pepper Fermentation
Keep solids under liquid, and ensure the rim and lid are clean. Work with clean tools. If mold forms with colored fuzzy spots, discard that batch. A thin white film that looks matte or stringy is often kahm yeast. Skim it and continue if the smell is pleasant.
The jar above was overfilled, and a non-sterile spoon was used to scoop them out. Learn from my early mistake.
Storage and safety
- The ideal temperature during active fermentation is 68 to 75°F and out of direct sunlight.
- After fermentation, store in the refrigerator
- Use within about 12 months for best flavor and texture. Long-aged mash for sauce can sit longer under clean conditions, but keep it monitored.
FAQs
Ferment them at 68-75°F. Once fermented, store them in the refrigerator. Keep them out of the direct sun.
Short ferment is usually 3 to 5 weeks. Long ferment runs 2 to 12 months
Refrigerated jars keep up to a year for best quality. Texture slowly softens over time.
Use a canning/pickling salt for brining peppers. Or any pure, non-iodized salt without anticaking agents.
That is how easy it is to ferment your own peppers so that you can make your own hot sauce!

Want to Grow Your Own Produce?
With my background in horticulture and entomology, readers often ask for help starting a vegetable garden. I created a beginner-friendly gardening series that walks through planning, planting, maintenance, and harvesting.
Helpful Tools
Contains affiliate links, for full disclosure, see FTC Disclosure, here.
- Kitchen Scale
- Food Processor
- Fermenting Lids
- fermentation weights
- Widemouth Quart Jars
- Masontops Fermenting Kit


Fermenting Hot Peppers
Ingredients
For Dry-Salting Method
- 1000 grams hot peppers, any variety will work See post for more information
- 25 grams canning salt see notes
For Brine Method
- 1 liter non-chlorinated water
- 25 grams canning salt see notes
- hot peppers
Instructions
Dry Salting Method
- Wash the peppers. Remove the stems.
- Remove stem from peppers.
- Grind in food processor.
- Mix the salt with the peppers. Mix well. The salt will draw water out of the peppers, and they will ferment in their own juices.
- Sterilize jars. Pack the peppers into the jars, pushing down contents to remove air. Leave 1-inch headspace.
Brining method
- Wash the peppers. Remove the stems. Chop or slice them. Pack the peppers into clean, sterilized jars.
- Cover the peppers in the jars with the water and salt mixture. It is important that the peppers stay below the surface of the brine. Weigh them down with fermenting weights.
- Ferment in a cool place for 1 to 4 months, up to years. For the first 2-3 weeks, burp jars daily; thereafter, burp once per week or use a fermenting lid.
- Use fermented peppers for making hot sauce.


Video
Notes
Salt and time that work
Salt controls which microbes thrive and helps texture. Weigh for accuracy.- Use 2 to 3 percent salt by weight for a faster, brighter ferment with more monitoring
- Use 3.5 to 5 percent for a slower ferment with a firmer bite
- Dry salting uses pepper weight for the math
- Brining uses water weight for the math
- Short ferment window is about 3 to 5 weeks. Flavor is complex and lively
- Long ferment window is 2 to 12 months. Flavor gets deeper and rounder over time
- Trust your nose. If they smell rotten or sour, the batch is bad. Discard.
- If a pink or white fungus appears on top, the ferment has gone bad. Discard.


I haven’t honestly used frozen. You could use habaneros but I’m not sure about freezing them first.
Have you tried fermenting in fido jars? It eliminates the worry over mold because the environment inside the jar is anarobic.
I haven’t yet but plan to invest soon. Have you used them?
I tried this. Ended up with 11/2 jars after one month. serannos. One jar has fungus with cottony mycellia, the other jar has what I think is yeast.–not cottony. Questions
1. If I boil the peppers awhhile are they safe to eat?
2. What does burp mean?
3. How does one release air?
4. How can I prevent fungus?
Many thanks,
MalcolmJohnson
Martindale, Texas
Hey Malcolm! The cottony jar, should be discarded. They are not safe to eat. Burp means releasing the air. To release the air, loosen the cap and lid, the air will release. Try to be careful not to contaminate the contents. Preventing the fungus is a matter of sterilizing jars and tools well. It could also be from the peppers themselves. Make sure to process only fresh peppers, with no visible signs of decay. I had a batch go bad this year too. It’s always good to make several jars, if you have enough peppers, so that you will end up with some good jars at the end. Sometimes it can’t be avoided. Good luck!
Easy and tastes great. I was wondering how you could tell it was mold and not the Kahm yeast that sometimes occurs if you don’t have enough head space? (you had mentioned you overfilled it) Thanks for the great info and making it easy to get into fermenting!
It was actually growing like mold, so I knew it wasn’t Kahm yeast. Thanks for the comment, Valerie! I’m so glad you liked them! Are you going to make hot sauce with them?