Homemade Corned Venison Curing

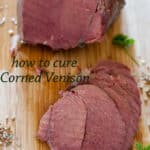


Believe it or not, this Corned Venison is so easy! You just need a couple of cheap items that you probably do not have in your pantry! If you are looking for great tasting venison recipes, this is certainly one of the best we have ever tried!

If you have never had venison or you think you don’t like it, it’s probably because a friend gave you some to try that he said was great.
Instead of it being great, it was hideous! Dry, tough, too chewy. Yuck.
Like any other new ingredient you use, it takes practice to learn how to cook venison so that it appeals to you!
This recipe is absolutely not anything like the afore mentioned venison. It is moist, juicy and more tender than a lot of corned beef I have eaten in my life. If you do not have access to venison, you can substitute beef.
What is corning?
Corning is the process of curing meat. In the days before refrigeration, meat was “corned” with large salt that resembled kernels of corn. to preserve it for longer term storage. See this short article from the USDA. Today corning is typically done with a brine.
Although it takes several weeks to corn the meat, it is not a very large time commitment. I will show you two different methods for corning the venison, brining and dry cure.
Differences between corned venison and pastrami
Pastrami is cold-smoked in a smoker. It is brined in similar spices as corned but is generally more sweet.
Ingredients you need
- boneless venison roasts
- pickling spice
- brown sugar
- curing salt
- garlic powder

Corned Venison – Brining Method
- Wash off venison.
- Place the 2 cups of water in a medium saucepan and let it come a boil.
- Place the pickling spices in the boiling water. Stir and simmer until dissolved. Let cool.
- Next place roasts in a container large enough to hold them plus 8 cups of water. Add 6 cups of plain cold water to the roasts.
- When pickling liquid has cooled, add it to the roasts.

If liquid does not completely cover the roasts, you will need to flip them every day or every other day. If the roasts are covered and you have a good lid, you can just shake up the container every few days.
Leave roasts in until fully cured. See section below, “How long to let roasts corn?”
We usually do at least 4 roasts per year. So I double the recipe and use a container that will hold at least a gallon, usually larger.
Corned Venison – Dry Rub Corning Method
Alternately, you can make a dry rub, instead of the brine to corn the venison or beef.
- Add Pickling Salt and all spices to a medium bowl.
- Mix the pickling salt and spices well.

- Place the meat in a container large enough to accommodate them. Sprinkle both sides liberally.
- Rub the spices into the meat. Use all of the spice mixture.


This is the venison after 24 hours. Continue to turn meat every day.
 This is the venison after 48 hours. Continue to turn meat every day.
 The venison after 5 days has darkened and is starting look more like corned meat!
Do you have to use nitrates?
Technically, you do not have to use the sodium nitrate / sodium nitrite. Be aware, however, the meat will be the color of cooked venison, not have the pretty pink color of corned meat.
The other consideration is that there may be a slight risk of botulism. Since this pathogen can be lethal, my advice is to use the nitrate!
How much cure to use
The other thing to be aware of, is that not all cures are made the same. Each product will use a different amount of cure. Be sure to calculate the quantity of cure for the amount of meat you are corning according to package directions, not the recipe below!
Recipe below is calculated using Morton’s Tenderquick, so if you use that, the measurements are accurate.
Which cuts are the best to use?
It is best to use the large roasts for the hind legs for corning. Cut such as the top sirloin, bottom round, top round or rump roast are perfect.
Don’t corn the loins or backstraps. They are already tender. The purpose of corning is to tenderize an otherwise tougher cut of meat.
How long to let roasts corn?
The length of time a roast takes to corn is related to thickness of the roast. As a general rule of thumb, corn roasts 5 days for each 2″ of thickness. Or 3-4 days per pound.
For large buck “football roasts” or top sirloin this can take 14-21 days. For normal sized bottom or top round roasts, 7-10 days is usually sufficient.
I have never had a batch that was left “too long”. So err on the side of longer brining time rather than shorter.
How to cook it once cured
Once you have brined your venison, it is time to cook it. I find that the slow cooker is the perfect tool to cook your corned venison. See the recipe here. The venison turns out tender and flavorful!

Apologies for the hideous photo but I thought I would show you a couple of oopses. This did not sit in the brine for quite long enough. Can you see the area in the center that is not red?
It is still perfectly fine and you don’t notice a difference in the flavor, it just isn’t as pretty.

As usual when we try a new recipe or use a new ingredient. It may take a few attempts sometimes to get it just right. This one brined long enough, but I over-cooked it so that it is falling apart.

I feel like Goldilocks here but this one is “Just Right”! 🙂
Can you cure meat that was previously frozen?
Yes, you can brine the meat after thawing in the refrigerator. It’s best not to refreeze but I have tried it and it is still fine. Make small batches after freezing though, for best success.
How to store the cured meat
Once the meat is finished curing, rinse it well under cold running water. Dry with paper towel. Either vacuum pack, or use freezer bags. Freezer paper works well, if you wrap it air tight.
Freeze until ready for use. Best if used within 1-2 months but will last up to 6 months. Thaw in refrigerator. Cook as desired. Here is our slow cooker corned venison recipe.
What can you make with it

The beauty of corned beef, or in this case venison, is that you can make such a variety of dishes.
When one thinks of corned beef, they immediately think of corned beef and cabbage for St. Patrick’s Day.
We did have that but I didn’t photograph it, for some strange reason. We have, however had a plethora of Reubens in the last few years.

Reuben sandwiches are a huge favorite with family and friends.

This Reuben dip was another hit with family and friends alike. Find the recipe here.

I did make a few other things besides reubens. This Corned Venison Hash and Eggs was divine!

Thought a bit of egg porn was in order! 🙂 This is Sweet Potato and Corned Venison Hash!

Finally, one last corned venison photo. This is a Reuben Salad! Not exactly health food but I felt better eating this rather than the sandwiches due to the fact that at least it contained something green!!
Want to learn more about How to Cook Venison? Don’t miss our awesome, Ultimate Guide! Complete with over 65 FREE Recipes from some of the top venison recipe developers in the world!
Tools I Use
Contains affiliate links, for full disclosure, see FTC Disclosure, here.
Connect with us through our social media pages! Facebook, Instagram, Pinterest, Twitter.
Please ask any questions or share your comments in the comments section below. We’d love to hear from you.
I hope you enjoyed the recipe today.
Enjoy. And have fun cooking!


Homemade Corned Venison – Brined
Ingredients
Corned Venison – Brine Method
- 2 large boneless rear leg roasts , either top rounds, bottom rounds, or bottom butt (about 5 lbs.)
- 2 cup water
- 6 Tablespoon sugar-based curing mixture (such as Morton’s® Tender Quick®)
- 1/2 cup brown sugar
- 4 1/2 teaspoon pickling spice
- 1 Tablespoon garlic, granulated
- 6 cup cold water
Dry Rub Method for Corning Venison
- 5 pounds venison leg roast
- 5 Tablespoon Morton’s® Tender Quick®
- 2 Tablespoon brown sugar
- 2 teaspoon black peppercorns
- 2 teaspoon garlic, granulated
- 1 teaspoon paprika
- 1 teaspoon bay leaf powder I grind up bay leaves in my spice mill, instead of buying them already ground.
- 1 teaspoon ground allspice
Instructions
Corned Venison – Brine Method
- Bring the 2 cups of water to a boil in a medium saucepan. Stir in the dry ingredients and stir until dissolved. Recipe for Homemade Pickling Spice.
- Pour the 6 cups of water into a large container and then stir in the pickling mixture. Place the venison into the the brine. Cover and refrigerate.
- The length of time needed for the venison to brine all the way through, depends on the thickness of the cut. Morton's® suggests 5 days for every 2 inches of thickness. So, if your roast is 4" thick, it will take 10 days to brine all of the way through! I brined the bottom butts for about 14 days to achieve the entire thickness was cured. The largest top rounds took about 21 days.
- For instructions to cook the venison, see here.
Dry Rub Method for Corning Venison
- Here is where to find the Morton’s® Tender Quick®
- Mix all ingredients in small bowl. Rub all over the surface of the roasts. Place roasts in a container or a sealable bag and place in the refrigerator. Cure for 5 days per 2 inches of meat thickness. Turn meat over once per day. Takes at least 5-7 days, for small roasts. Up to 21 days for larger roasts.
- Once corned, meat must be rinsed off and cooked thoroughly.
- For instructions to cook the venison, see here.
Video
Notes
Nutrition
Recipe for wet brined corned venison modified from All Recipes
Recipe for dry rub corned venison modified from Miss Homemade
Originally posted April 19, 2017 Updated January 1, 2021


Did the wet brine with Morton’s TenderQuick on 2 roasts, leaving them 21 days. Cooked according to the corned venison slow cooker recipe on here, which gave them a bit more of a carrot-y flavor than I’m used to with the corned beef from the deli. But the roasts and reubens were so easy and so perfectly delicious, I may never do anything with my roasts again but corn them! Thank you, Beth, for all the great venison recipes and tips. You make hunting/processing season so much easier for this city-gal turned ranch wife!!
Oh, thank you so much Jessica! We love them too. I’m so glad that you like the recipes.
I love venison but I don’t have it often, and never corned! It looks mouthwatering, especially in those sandwiches!!
It hard to find venison sometimes. Luckily my husband and sons love to hunt so I’m always trying to come up with different recipes! Thanks Michelle!
The meat looks absolutely delicious. Tender and juicy. I bet that dry rub gave the perfect flavoring. Great recipe!
It was surprisingly juicy and moist. Thank you for your comment, Natalie!
This looks delicious and I appreciate all of the pictures that you included for each step of the process! I also love all of the options you have for this corned venison! What a great idea and this looks delicious! Thanks for sharing!
I really appreciate your comments, Luci! Many of my readers prefer step by step instructions!