Canning Pineapple


Canning pineapple is a great way to preserve it and enjoy it all year round, even when it’s not in season.

Why can pineapple?
Since pineapple is available in the US year-round, convenience is the major benefit of canned pineapple on your pantry shelves. Canned pineapple is easy to store and use. Your prep time for recipes will be less, too, because the pineapple is ready to go. No peeling and cutting is required to whip up your favorite dessert or even a main dish like this sweet and sour chicken.
What you need
- Pineapple: You’ll need fresh, ripe pineapples for canning. Choose pineapples that are firm and have a sweet fragrance. They should only have a bit of green still showing on the top end, near the “leaves”. The rest of the pineapple should be yellowing between the “eyes.” See the photo below. The fruit on the right is the least ripe because it has more green between the “eyes.” You can also try to pull one of the center-most leaves out. It should pull out easily with little resistance when fully ripe.
- Water: Water is needed to create the syrup that the pineapple will be canned in. You can use pineapple juice, apple juice, or white grape juice instead of water. If you would like to sweeten the pineapple, use a light or very light syrup; if your pineapple is sufficiently ripe, there shouldn’t be a need to sweeten it. See below for instructions.

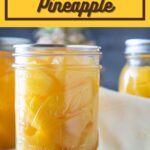
Pineapples can be raw or hot-packed. The raw pack will take less time and one less pan, but the fruit tends to float. We prefer a hot pack with its own juices, but you can also use a syrup. For our purposes, we will make our own pineapple juice from the core of the pineapples that we’re canning. Doing this means nothing goes to waste.
How to prepare the fruit

Lay the fruit on its side. Cut off the top with a sharp knife.

Place the fruit upright on your board. Slice down vertically to slice off the skin.
Once it’s peeled, slice off the bottom.

Cut out all of the eyes. The seeds can be left in.
Be sure to cut out all the eyes; they are a choking hazard for young children. (Experience talking here.)

Use a sharp paring knife to cut the eyes out.

Cut the fruit into quarters. Slice it down vertically to remove the core. Save the cores.

Cut the fruit into bite-sized chunks.
Pro Canning Tips
- Preheat the Waterbath: When you start the recipe, fill the canning pot about ¼ or ½ way up. Heat the water. Place the prewashed jars into the pot so the jars can get hot, too.
- Lids: Never reuse lids. Lids are meant to be single-use. This will ensure that your food is shelf-stable and safe for your family to eat. If you’d like to repurpose them, use them for dry storage, not to recan something else.
- Non-metallic Utensils: When canning, use wooden or heat-safe plastic utensils. This is more to prevent the jars from chipping or cracking than a food-safety issue.
- Hot Jars: Hot foods should be loaded into hot jars. We remove one jar at a time from the canning pot, where it has preheated, and fill it. Then, remove the next jar, fill it, and so on. Once all the jars are filled, remove air bubbles and wipe the rims of all of the jars. Then center prewarmed lids and screw on bands fingertip tight. Add all of the filled and capped jars to the canning pot with warm, not boiling, water.
- Bring the canning pot to a boil: You just want the water simmering when you add the filled jars. Turn up the heat once the jars are in the canning pot. Monitor the water. Once it boils, start the timer. Process the jars for the specified time in the recipe. Do not deviate from the recommended processing time. This could risk food safety issues.
- Jars will displace more water once they’re filled: When you add the filled jars, less water will be needed to cover them with two inches of water. Remove some of the water to reduce the risk of the pot boiling over. This is especially important for quart jars.
How to make it
Get your water bath canner on the stove and start to heat it. Add the jars so that they will be warm when you add the fruit to them. We’ll can them with pineapple juice, if you’d like a syrup, see the section below “Canning Syrups”

Add the cut or sliced fruit to a large pot. Barely cover it with water.
Bring to a boil over medium-high heat. Once it’s boiling, reduce the heat and simmer for about ten minutes.

Add the pineapple cores to a large saucepan and barely cover them with water. Bring to a boil, then reduce heat and simmer for about 30 minutes.
This will make pineapple juice to cover them with.
Pro Tip: Whenever you cut up pineapples, save the cores in a plastic bag and freeze them until you have enough for a batch of pineapple juice.

Notice that after cooking the chunks, the water that you added resembles pineapple juice.
For this reason, we don’t recommend buying commercially prepared juices. Using water is a great money saver.

Load the chunks into the jars using a slotted spoon. Leave a ½-inch headspace.

Ladle the cooking water, juice, or hot syrup into the jars, preserving the headspace.

Remove air bubbles using a bubble tool, plastic or wooden chopstick, or knife.

Wipe the jar rim clean with a damp paper towel.

Center the lid on the jar using your lid lifter. Screw on the bands fingertip tight.
Load the jars into hot water in your water bath canning pot.
Process the jars for 20 minutes for quarts or 15 minutes for pints for altitudes under 2000 feet above sea level. Adjust for altitude. (See recipe notes below for adjustments.
Get the canner water hot. Wash the jars and lids. Add the clean jars to the canning pot to heat. Once the jars are filled, add them to the canning pot. Bring the water in the pot to a boil. Once the water is boiling, set the timer.
When the processing time is complete, remove the pot from the heat, carefully open the lid, and partially lift it off the top of the canning pot. Let it rest like that for 5 minutes.
Then, remove the lid and let the jars rest in the canning pot for an additional 5 to 10 minutes.
After resting, remove the jars onto a kitchen towel placed on your counter and let them thoroughly cool for 12-24 hours, undisturbed. You may hear the lids pinging sometime in the next hour. This is music to a canner’s ears. It is due to the reaction of the lids being sealed to the jar.
Check the seals. Press down in the middle of the lid. If it flexes up or down, the jar is not sealed and should be refrigerated and used first.
Then, remove the bands. Gently pick up the jar by the lid to check the seal further. Again, if it is not sealed, use it first.
Label jars with contents and the date. Store in a cool, dark place for at least a year. Avoid areas with large temperature fluctuations.
Do not stack jars on top of each other. This can compromise the seals. If you run out of room on your shelf, use a sheet of cardboard or a thin piece of wood and place that on top of a row of jars. Then you can put jars on top of that. This will distribute the weight evenly.
Before using any canned goods, always inspect the packaging and the food itself. Make sure that it looks and smells as it should. If it doesn’t, it’s best to err on the side of caution and discard it.
Types of syrup
Quantities of water and sugar in syrups
- very light syrup – 6½ cups water to ¾ cup sugar
- light syrup – 5¾ cups water to 1½ cups sugar
- medium syrup – 5¼ cups water to 2¼ cups sugar
- heavy syrup – 5 cups water to 3¼ cups sugar
- honey syrup – 1 cup honey to 4 cups water or juice
- juice – you can use apple or white grape juice instead of water to make syrup.
With most canning recipes that require the use of liquids, it’s a good idea to give the jars a quick rinse before storage. Sometimes the syrup (or food) may siphon (see more below in the section ‘What is siphoning’) out and leave a sugar residue on the outside of the jar where mold can grow.

Why did my jars lose syrup? / What is siphoning?
Siphoning is a common occurrence that sometimes happens when canning. Happens to the best of us.
It’s due to a large difference in temperature and/ or air pressure during the canning process. It is more prevalent when using liquids, such as water or syrups, rather than solid products like jams.
There can be several reasons why siphoning occurs, even with jars that have been sealed. The most common cause is not letting the jars rest in the canning pot after they have finished processing.
Another common reason is that the jars are not hot when the hot food is added. Make sure that your jars are hot when the food is added. Then fill your jars and place them in the canning pot as soon as possible to avoid the jars cooling before submerging them in the hot water.
It can also be beneficial to have the canning pot at a high simmer, not a full rolling boil, when adding the hot jars into the pot. Then, once all the jars are added, crank up the heat and bring the pot to a boil. Once it’s boiling, you can start your timer.
Carefully remove all bubbles to minimize siphoning. Also, make sure you have the proper headspace for the product you are canning. If a recipe calls for ½ inch headspace (the space between the product and the rim of the jar), do not fill it to ¼ inch headspace. This can cause siphoning.
As noted in the instructions above, we recommend removing the lid of the canning pot and allowing the jars to rest for five minutes. This allows the jars to cool more slowly.
What if I experience siphoning?
Siphoning does not mean that all of your hard work will be lost, but there are a few steps to take to ensure that the food you are storing is safe for your family to consume.
- Check your seal. Press down in the center of your canning lid. The lid should not flex up or down; if it does, the product must be refrigerated and consumed first.
- Does your food still look fresh with bright colors?
- Have you lost more than half of your canning liquid?
Even if you lost a lot of your canning liquid, but the jars are sealed, and the colors are still good, they are perfectly safe to eat. Keep in mind, though, that if you lose a lot of the liquid and the food is exposed, it will lose color quickly and should be used first.
Try to follow these simple steps to avoid siphoning, but be aware that you will still experience siphoning on occasion.
How to use it
- Add canned pineapple to your favorite smoothie recipe for a sweet and tropical twist. To make a thicker, frostier smoothie, you can freeze the pineapple chunks beforehand.
- Use it in baked goods, such as pineapple upside-down cakes, cupcakes, or muffins. The fruit adds sweetness and moisture to the recipe.
- This pineapple pie is the perfect pie to make.
- Add to salads for a sweet and tangy flavor. It pairs well with greens, nuts, and cheese.
- Use it as a topping for pancakes, waffles, or ice cream.
- dd it to stir-fry dishes for a sweet and sour flavor. It pairs well with chicken, shrimp, and vegetables.
- Make a fresh and pineapple salsa with canned pineapple, tomatoes, jalapenos, onions, and cilantro. Serve it with chips or as a topping for fish or chicken.
More pantry items
Helpful Tools

Connect with us through our social media pages! Facebook, Instagram, Pinterest, Twitter.
Please ask any questions or share your comments in the comments section below. We’d love to hear from you.
I hope you enjoyed the recipe today.
Enjoy. And have fun cooking!


Canning Pineapple | How to Can Pineapple
Ingredients
- 2 large pineapples see notes below.
- water, juice or syrup see notes below.
Instructions
To prepare the fruit
- Lay the fruit on its side. Cut off the top with a sharp knife.2 large pineapples
- Place the fruit upright on your board. Slice down vertically to slice off the skin. Once it’s peeled, slice off the bottom.
- Cut out all of the eyes. The seeds can be left in. Be sure to cut out all the eyes; they are a choking hazard for young children. (Experience talking here.) Use a sharp paring knife to cut them out.
- Cut the fruit into quarters. Slice it down vertically to remove the core. Save the cores.
- Cut the fruit into bite-sized chunks.
How to can it – water bath
- Get your water bath canner on the stove and start to heat it. Add the jars so that they will be warm when you add the fruit to them. Note: Once the jars are filled, they will need less water to cover them, so when you add the jars before processing, be sure that the water only covers them by 2 inches so that the pot doesn’t boil over.
- Add cut or sliced fruit to a large pot. Barely cover with water. Bring to a boil over medium-high heat. Once it’s boiling, reduce the heat and simmer for about ten minutes.water, juice or syrup
- Add the pineapple cores to a large saucepan and barely cover them with water. Bring to a boil. Reduce heat and simmer for about 30 minutes. This will make pineapple juice to cover them with.
- Notice that after cooking the chunks, the water that you added resembles pineapple juice. For this reason, we don’t recommend buying commercially prepared juices. It’s a great money saver just to use water.
- Load the chunks into the jars using a slotted spoon. Leave a ½-inch headspace.
- Ladle the cooking water, juice, or hot syrup into the jars, preserving the headspace.
- Remove air bubbles using a bubble tool, plastic or wooden chopstick, or knife.
- Wipe the jar rim clean with a damp paper towel.
- Center the lid on the jar using your lid lifter.
- Screw on the bands fingertip tight. Load the jars into your water bath canning pot.
- Process the jars for 20 minutes for quarts or 15 minutes for pints for altitudes under 2000 feet above sea level. Adjust for altitude. (See recipe notes below for adjustments.
- Once processing time is done, remove the pot from the heat and carefully open the lid and move it partially off the top of the canning pot. Let it rest like that for 5 minutes.
- Then remove the lid and allow the jars to rest another 5 to 10 minutes in the canning pot.
- After resting, remove the jars onto a kitchen towel placed on your counter and let them thoroughly cool for 12-24 hours, undisturbed. You may hear the lids pinging sometime in the next hour. This is music to a canner’s ears. It is due to the reaction of the lids being sealed to the jar.
- Check the seals. Press down in the middle of the lid. If it flexes up or down, the jar is not sealed and should be refrigerated and used first.
- Then remove the bands. Gently pick the jar up by the lid to further check the seal. Again, if it is not sealed, use it first.
- Label jars with contents and the date. Store in a cool, dark space.


Notes
- very light syrup – 6½ cups water to ¾ cup sugar
- light syrup – 5¾ cups water to 1½ cups sugar
- medium syrup – 5¼ cups water to 2¼ cups sugar
- heavy syrup – 5 cups water to 3¼ cups sugar
- honey syrup – 1 cup honey to 4 cups water or juice
- juice – you can use apple or white grape juice instead of water to make syrup.
Nutrition
Originally published April 25, 2023.


