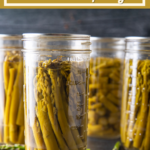
Canning Asparagus | How to Can Asparagus


Canning asparagus is a fantastic way to extend asparagus’ short season. You can enjoy asparagus all year with lots of jars on the pantry shelves.

Asparagus is a springtime favorite for many with its unique, tender flavor and excellent nutritional value.
Canning may sound daunting if you’re new to it, but it’s a rewarding journey. It will grant you a pantry full of home-preserved fruits and vegetables to brighten your winter meals and a step towards self-sufficiency and waste reduction.
The satisfaction of hearing the “pop” of a successfully sealed jar is nothing short of joyous. We will walk you through the process step-by-step, from choosing the right asparagus to the actual canning process and everything in between.
Why should you consider canning asparagus?
Asparagus has a short season if you are looking for farm-fresh produce. It is available all year in grocery stores but the flavor doesn’t compare! Canning will lock in all of the nutrients. It is also a great way to help you reduce food waste and live a more sustainable life.
Growing your own asparagus can save you a lot of money. Even if you buy it at the farmer’s market, it will be cheaper than the grocers.
What you need
- Fresh Asparagus: You’ll need approximately 2.5 to 3.5 pounds per quart jar. Choose asparagus that is fresh, firm, and bright in color, ideally picked within the last 24 hours. The spears should be uniform in size for consistent cooking.
- Salt: Pickling or canning salt is ideal because it doesn’t contain iodine or anti-caking agents that can cloud the brine. You’ll need about 1/2 teaspoon per pint jar (1 teaspoon per quart jar), but this is completely optional. Adjust to taste. We generally use less salt.
- Water: For blanching the asparagus and for making the brine.
- Optional Spices: Depending on your taste, add a clove of garlic, a pinch of dill seeds, or a small hot pepper to each jar for extra flavor.
- Canning Jars and Lids: Use wide-mouth pint or quart jars for asparagus. We prefer one-and-a-half-pint (24 oz) wide-mouth jars. The number you’ll need depends on how much asparagus you have. The lids should be new, but reuse the rings or bands if they’re not rusty or bent.
Please note that for the canning process, you will also need a pressure canner and a large stockpot, a jar lifter, a funnel, and a clean cloth or paper towel for wiping the jar rims.

Hot pack vs. cold pack
There are two standard methods for preserving fruits and vegetables: hot pack and cold pack (also known as raw pack). Each of these methods has its pros and cons, and the best choice often depends on the type of food being canned and personal preference. Let’s take a look at the advantages and disadvantages of both:
Hot Pack
In the hot pack method, food is heated in boiling water or steam and then packed into jars with boiling syrup, juice, or water before being processed in a canner.
Pros of Hot Pack:
- Better Quality: Hot packing often results in a better color and flavor for preserved food.
- Less Floating: Hot packing can minimize the floating of the food in the jars since the initial heating expels trapped air in the food.
- More Quantity: The heat treatment helps to shrink the food, meaning you can pack more into each jar.
- Better Sterilization: The heating process kills more bacteria, yeast, and enzymes, potentially extending the shelf-life of the canned goods.
Cons of Hot Pack:
- Time-Consuming: Hot packing can be more lengthy, as it involves an extra step of pre-cooking the food.
- More cleanup: You will have a couple more dirty dishes if you hot pack.
- Soft Texture: Overcooking during the hot pack process can lead to more soft canned products, which some people may not prefer.
Cold Pack (Raw Pack)
In the cold pack method, raw, unheated food is packed into jars and covered with boiling water or other hot liquid before processing in a canner.
Pros of Cold Pack:
- Quick and Easy: Cold packing is faster and easier than hot packing since it eliminates the need to pre-cook the food.
- Firmer Texture: Cold-packed foods usually have a crispier texture after canning than hot-packed foods.
- Less Cleanup: You won’t have the extra dishes to wash when cold packing.
Cons of Cold Pack:
- Possible Floating: Food might float in the jars, leading to discoloration of food sticking out above the liquid.
- Less Quantity: Since the food doesn’t shrink as it would with hot packing, you might not be able to fit as much food into each jar.
- Shorter Shelf-Life: Cold pack doesn’t kill bacteria and enzymes as effectively as a hot pack, potentially resulting in a shorter shelf-life.
Choosing between a hot pack and a cold pack often depends on the type of food you’re canning and your personal preferences regarding time commitment, texture, and shelf life.
We have done extensive testing with the two types of canning, specifically with asparagus. We find very little difference between a hot pack and a raw pack when canning asparagus. The texture, float, and flavor are very similar. With some vegetables and fruit, such as tomatoes, it makes a big difference. But with asparagus, it does not.
How to can asparagus
Step One
Wash asparagus. Cut spears into lengths that will fit in your chosen jars.

Step Two
Use a vegetable peeler or a sharp paring knife to remove tough scales for larger spears and ends.

For raw pack
Step Three
Pack spears or pieces into jars as tightly as possible.
Cover with boiling water. Leaving a 1-inch headspace.
Wipe the jar rims with a damp paper towel.
Center warm lid on jar. Screw on the band fingertip tight.
Process just as you would for a hot pack.

For hot pack
Step Three
Set up a large bowl as an ice bath.

Step Four
Bring a large pot of water to a boil. Add asparagus and blanch for two minutes.

Step Five
Quickly add the blanched asparagus to the ice bath.

Step Six
Loosely pack the jars with the blanched asparagus.
Cover with boiling water, leaving 1-inch headspace.

Step Seven- Adjust lids. Screw on the band fingertip tight. Add jars to canning pot with spacer rack insert added.
Step Eight- Seal the pressure canner. Turn on the burner. Bring to a boil and allow the pot to vent for a full ten minutes.
Step Nine- After venting, add the weighted or dial gauge pressure regulator. Bring the pressure up to the specified pressure (psi) and maintain it there. See pressure recommendations in the recipe notes below.
Step Ten- Process for the specified times as per the recipe instructions. Always set a timer. (see times in recipe below)
Step Eleven- Keep an eye on your pressure and ensure you do not drop below the specified pressure at any time during the canning process. If your pressure drops below the correct pressure, restart your timer.
Once the time is up, remove the pot from the heat source. Let pressure naturally release from the pot. Carefully remove the lid.
Allow the jars to sit in the canning pot for about 5 minutes to cool down slowly. Then remove them from the canner with your jar lifter. Place them on a towel on your kitchen counter.
Let them fully cool. After 12-24 hours, check to make sure the jars are sealed. Press down in the center of the lid. If the lid flexes up or down, the jar hasn’t been sealed and must be refrigerated and used first.
You can re-can them with a new lid if you’d like.
New to canning? Start with our comprehensive article on “How to Can Everything“. It will walk you through all of the dos and don’ts related to canning.
How to use it
Canned asparagus doesn’t have the texture of fresh asparagus. We prefer our asparagus al dente, like pasta. It should have a bit of a bite left to it. When you can it, it inevitably gets overdone.
We find canned asparagus best used in dishes where the texture doesn’t matter. Soups and stews are good uses for it. It also makes a delicious purée to serve with dinner. It can also be good in quiches or omelets.

How to store canned asparagus
- Leave jars undisturbed for 12-24 hours until they are totally cooled. Check the seals. If any jars have not been sealed, they should be refrigerated and used first.
- Remove the bands. They are store water underneath and rust. They can also camouflage bad seals.
- Label and date the jars so that you can rotate your pantry and use the oldest first.
- Store in a cool, dark place, like a basement or root cellar. The ideal storage temperature is between 50 and 70°F (10-21°C).
- For optimal quality and nutritional value, it’s generally recommended to use home-canned goods within one year. New Ball lids can be stored for 18 months.
- Before using your canned goods, inspect the jar, lid, and contents for signs of spoilage, such as mold, an off smell, gas bubbles, or spurting liquid when opened. If you suspect spoilage, it’s best to discard the food.
More pressure canned foods


Canning Asparagus
Ingredients
- 3½ pounds asparagus
- 1 teaspoon salt optional
Instructions
- Wash asparagus. Cut spears into lengths that will fit in your chosen jars.3½ pounds asparagus
- Use a vegetable peeler or a sharp paring knife to remove tough scales for larger spears and ends.
For raw pack
- Pack spears or pieces into jars as tightly as possible.Cover with boiling water. Leaving a 1-inch headspace.Wipe the jar rims with a damp paper towel.Center warm lid on jar. Screw on the band fingertip tight.Process just as you would for a hot pack.
For hot pack
- Set up a large bowl as an ice bath.
- Bring a large pot of water to a boil. Add asparagus and blanch for two minutes.
- Quickly add the blanched asparagus to the ice bath.
- Loosely pack the jars with the blanched asparagus. Add salt, if using.Cover with boiling water, leaving 1-inch headspace.1 teaspoon salt
- Adjust lids. Screw on the band fingertip tight. Add jars to canning pot with spacer rack insert added.
- Seal the pressure canner. Turn on the burner. Bring to a boil and allow the pot to vent for a full ten minutes.
- After venting, add the weighted or dial gauge pressure regulator. Bring the pressure up to the specified pressure (psi) and maintain it there. See pressure recommendations in the recipe notes below.
- Process for the specified times as per the recipe instructions. Always set a timer. (see times in recipe below)
- Keep an eye on your pressure and make sure that you do not drop below the specified pressure at any time during the canning process. If your pressure drops below the correct pressure, restart your timer.Once the time is up, remove the pot from the heat source. Let pressure naturally release from the pot. Carefully remove the lid.Allow the jars to sit in the canning pot for about 5 minutes to cool down slowly. Then remove them from the canner with your jar lifter. Place them on a towel on your kitchen counter.


Notes
Nutrition
Originally published July 10, 2023.


