Honeysuckle Jelly
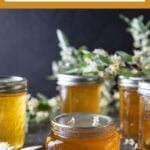

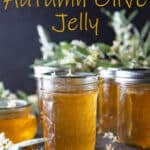
We’re turning the essence of spring into a jar of edible sunshine – with our recipe for homemade Honeysuckle Jelly or Autumn Olive Jelly.

Fragrant flowers can create a delicately floral spread that is delicious on toast, but it is equally comfortable as part of a dessert.
About Bush Honeysuckle
Bush honeysuckles are an invasive species in the Northeastern United States. They were introduced into the Americas as a landscape plant in the late 19th century and have since become abundant. Three species exist in New York.
We have Lonicera mackii in some unused fields on our property, so we harvest them for jelly every few years. These fields are mowed every 3-4 years to try to control the spread.
In addition, this recipe will also work for Russian olive (Eleagnus angustifolia) and Autumn olive jelly (Eleagnus umbellata) flowers, which are also both invasive species in the Northeast.
How to harvest blooms
- Time of Harvest: The best time to harvest honeysuckle blossoms is in the late spring or early summer when they are in full bloom and full of that sweet nectar. You’ll want to choose a dry, sunny day, as the flowers will have their best scent and flavor. Early morning or late evening is ideal, as the flowers are most fragrant.
- Choosing the Right Blossoms: Look for fully opened flowers that are bright and fresh-looking. Avoid any that are wilting, brown, or damaged. Remember, the better the blossoms, the better the flavor of your jelly.
- Picking the Blossoms: Just pick off the flowers, removing the sepal if it stays with the flower. For Russian or Autumn Olive flowers, just cut off a few branches. The flowers will fall right off when they are shaken. Or run your hand along the branch, and the flowers will fall off. Remove any sepals that stay with the flower.
- Quantity: This recipe requires about 4 cups of fresh honeysuckle blossoms. That quantity might sound like a lot, but honeysuckle blossoms are easy to remove from the stem, so it doesn’t take too long to gather this amount.
- Cleaning: Once you have harvested the blossoms, give them a rinse under cool water to remove any dirt or tiny insects. Allow them to air dry for a few hours.
Now that you have your blossoms, it’s time to make your honeysuckle jelly!
What you need
- Honeysuckle Blossoms: You’ll need about 4 cups of fresh honeysuckle blossoms. Make sure to pick them from a location that is untreated with pesticides. Remember only to gather the flowers, not the leaves, sepals (the small green tips on the stem end of the flower), or stems. To remove the sepals, just pop them off with your fingernails. You can also use Russian or Autumn Olive blossoms.
- Water: The water is to steep the blossoms to extract their delicate flavor.
- Lemon Juice: The juice enhances the flavor of the jelly, acidifies the tea so that it is safe for canning, and helps it to set.
- Pectin: This natural setting agent will give the jelly its firm, spreadable consistency.
- Sugar: Sugar sweetens the jelly and helps to preserve it.

How to make it
Step One
Gather blooms. Pictured left is Eleagnus umbellata, Autumn olive.
Remove sepals (the small green tips) if they stick to the blossom.
Rinse under cool water.
Step Two
Add the flowers to a quart jar or another heat-safe container.

Step Three
Pour in boiling water. Stir gently.

Step Four
Let this “tea” infuse overnight, if possible.

Step Five
Strain out the flowers. Squeeze most of the juice by gently pushing them with a spoon.

Step Six
Pour the tea into a large pan. Add lemon juice.

Step Seven
Mix the powdered pectin with ¼ cup of sugar.
Add this mixture to the tea.
Bring the mixture to a full boil over high heat.

Step Eight
Slowly pour in the rest of the sugar, stirring constantly. Bring the mixture to a full rolling boil, boil for one full minute.

Step Nine
Remove the pot from the heat. Ladle hot jam into warm jars, leaving ¼ inch headspace.

Step Ten
Remove air bubbles. Wipe the rims with a damp towel.
Center the lid on the jar. Screw on the bands fingertip tight.

Get the canner water hot. Wash the jars and lids. Add the clean jars to the canning pot to heat. Once the jars are filled, add them to the canning pot. Bring the water in the pot to a boil. Once the water is boiling, set the timer.
When the processing time is complete, remove the pot from the heat, carefully open the lid, and partially lift it off the top of the canning pot. Let it rest like that for 5 minutes.
Then, remove the lid and let the jars rest in the canning pot for an additional 5 to 10 minutes.
After resting, remove the jars onto a kitchen towel placed on your counter and let them thoroughly cool for 12-24 hours, undisturbed. You may hear the lids pinging sometime in the next hour. This is music to a canner’s ears. It is due to the reaction of the lids being sealed to the jar.
Check the seals. Press down in the middle of the lid. If it flexes up or down, the jar is not sealed and should be refrigerated and used first.
Then, remove the bands. Gently pick up the jar by the lid to check the seal further. Again, if it is not sealed, use it first.
Label jars with contents and the date. Store in a cool, dark place for at least a year. Avoid areas with large temperature fluctuations.
Do not stack jars on top of each other. This can compromise the seals. If you run out of room on your shelf, use a sheet of cardboard or a thin piece of wood and place that on top of a row of jars. Then you can put jars on top of that. This will distribute the weight evenly.
Before using any canned goods, always inspect the packaging and the food itself. Make sure that it looks and smells as it should. If it doesn’t, it’s best to err on the side of caution and discard it.
New to canning? Start with our comprehensive article on “How to Can Everything“. It will walk you through all of the dos and don’ts related to canning.

How to Use the Jelly
- Breakfast Spread: This is the most common use. Spread a dollop of floral jelly on toast, muffins, scones, or croissants. It’s a yummy way to start the day with a hint of springtime sweetness.
- Pair with Cheese: Floral jellies make a delicious pairing with cheeses. Try them with creamy brie, tangy goat cheese, smooth cream cheese, or sharp cheddar on a cheese platter with crackers, toast, or fresh bread. The sweetness of the jelly balances the richness and saltiness of the cheese.
- Dressings and Marinades: Mix floral jelly with vinegar, olive oil, and herbs to create a unique salad dressing. For a sweet and floral note, you can use it in a chicken, pork, or fish marinade.
- Glazes: Floral jellies also make a delicious glaze for baked goods, such as muffins or cakes. They also make an excellent glaze for roasted meats, especially poultry.
- Tea and Cocktails: Stir a spoonful into hot tea for a floral twist. You can also use floral jellies in cocktails, either as a sweetener or to create interesting layers of flavor.
- Desserts: Use floral jelly in desserts like parfaits, trifles, or crepes as a filling. Warm it slightly and drizzle it on top of vanilla ice cream or yogurt.
- Gifts: Floral jellies also make beautiful homemade gifts. The jelly’s bright yellow color and unique flavor make for a special present, especially when elegantly packaged.
Remember, while these suggestions are great starting points, there are no strict rules about how to use floral jellies. Use your imagination and invent some more uses.
More unique jelly recipes


Honeysuckle Jelly | Autumn Olive Jelly
Ingredients
- 4 cups honeysuckle flowers
- 4 cups water
- 2 tablespoons lemon juice
- 4 tablespoons classic pectin see recipe notes
- 4 cups Sugar
Instructions
- Shake your honeysuckle blooms after picking to remove any bugs or dirt. If you'd like you can rinse them in cool water.4 cups honeysuckle flowers
- Remove the white petals from the small green sepals that hold them to the branch.
- Boil the water. Pour the water over the petals. Let this "tea" steep for 10 minutes or overnight to achieve the color and flavor that you want. (Put the tea in the refrigerator after it cools to room temperature)4 cups water
- Prepare canning jars and lids by washing and heating them before starting the jelly. Get your canning pot on the stove.
- Strain the petals from the tea using a fine mesh strainer, a jelly bag or cheesecloth. Discard petals. you should end up with 3-3½ cups of the infusion, or tea.
- Add the honeysuckle tea, (you should end up with 3-3½ cups of tea) pectin and lemon juice in a large saucepan. Bring to a boil that can't be stirred down.2 tablespoons lemon juice, 4 tablespoons classic pectin
- Add sugar all at once. Stir constantly until the jelly comes to a full rolling boil again. Boil for one minute. Remove from heat.4 cups Sugar
- Ladle hot jelly into hot jars leaving a ¼-inch headspace. Remove bubbles if necessary.
- Wipe the rim of the jars clean with a damp paper towel to remove any debris.
- Center the lid on the jar. Screw on the bands fingertip tight.
- Process jars for 10 minutes, adjusting for altitude. After processing is complete, let the jars rest in the hot water for at least 5 minutes so that they cool slowly.
- Remove jars to the counter and leave undisturbed for 12-24 hours until fully cooled. Check seals.Store jars in a cool, dark place for at least one year.


Notes
- Since the jelly is processed for more than 10 minutes, there is no need to use sterilized jars.
- This recipe is fine for a water bath canner.
- Use blooms that have not been sprayed with chemicals, insecticides, or inorganic fertilizers.
- Honeysuckle jelly is delicious on toast or a bagel with butter. It will transport you back to spring in the middle of winter.
- It makes an amazing peanut butter and jelly sandwich.
- Top a cracker or English muffin with some cream cheese and a dab of jelly.
- Use it as a condiment for your grazing platters. It’s especially good with soft cheeses like brie, camembert, goat cheese, or queso fresco.
- Use it as a filling for cookies, cakes, and cupcakes.


I made Autumn Olive last year and it’s very good. It’s versatile using it in cooking, especially to make a pork roast glaze. I made the Honeysuckle this year and I’d give it mixed reviews. It was really bland, not what I had hoped. I used the remaining tea and mixed it half and half with dandelion tea for a much better flavor. I’m not giving up, actively looking for more flowers to try again.
I like the Autumn Olive better too. Have you tried peony and lilac? I think I prefer the peony, but they’re both good. Thanks for letting me know your thoughts, Michelle.