
Squash Relish

Making squash relish is a great way to use up excess squash from your garden. It is a sweet relish that is delicious on so many things. Read on to learn more.

🍽️ Recipe Name: Squash Relish
⏰ Ready In: 1 day 1 hour 20 minutes
⏳ Prep Time: 30 minutes
🔥 Cook Time: 30 minutes
👥 Serves: 176 tablespoons
🥕 Main Ingredients: Yellow squash, onions, red bell peppers, sugar, vinegar, turmeric, mustard, black pepper, celery seed
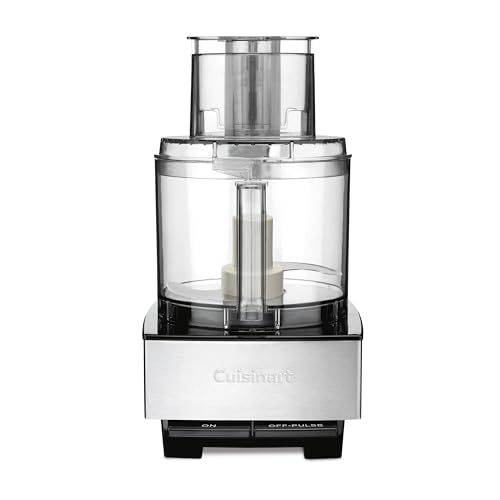
🍳 Special Equipment: Food processor, large pot, pint canning jars, water bath canner
⭐ Why You’ll Love It: Sweet, tangy, and easy to make, this relish is a delicious way to use extra garden squash and stock your pantry.
👇 Full measurements and instructions are in the recipe card below.
If you have ever grown summer squash like zucchini and yellow squash, you know that they can be very prolific. For mere pennies, it’s easy to stock the pantry with jars of squash relish. The best part is that it is one of the easiest canning recipes you will find. Making a large batch requires only about 20 minutes of hands-on time, so this recipe is perfect for beginners.
A couple of plants yield so much fruit. It is hard to come up with the right uses for all of them. They are delicious sautéed with a bit of garlic scape butter and zucchini. They are good in quick breads and cakes, but what else can you do with them that will use up lots of that fruit?
This yellow squash is the perfect way to use up lots of fruit.
What You Need
- Yellow squash: Fresh yellow squash is the best to use for this recipe. Use fresh squash that is firm and has good color. Relish is a great way to use up squash that is too large to eat. No garden? Farmer’s markets and farm stands sell squash for cheap.
- Red Pepper: Fresh red bell peppers that are free from bad spots.
- Sweet Onion: Sweet white or Vidalia onions are fine.
- Salt: Use pickling or canning salt. Don’t use iodized table salt.

For the Brine
- Apple Cider Vinegar: Use 5% acidity ACV to make the relish the proper pH for canning.
- Celery Seed: Celery seed adds a fresh, herbal note to the relish.
- Turmeric: Turmeric adds the signature color to sweet relish and a warm, earthy note.
- Dry Mustard: Dry mustard adds a bit of astringent, slightly bitter heat to any dish.
- Black Pepper: Coarsely or freshly ground black pepper is best.
How to Make Squash Relish

Wash squash under cool running water to remove any dirt or debris.
Cut the squash in half. If they are large, scoop out the seeds.
Cut off the stem and blossom end. Trim any blemishes.

Cut the squash into pieces that are wide enough to fit into the chute of your food processor.

Pulse the food processor until the pieces are your desired size. We prefer pieces that are a bit larger to provide more texture to the finished product.
Place the squash in a large, non-reactive bowl.

Pulse the pieces in a food processor until the pieces resemble the size of commercial relish.

Cut the peppers in half. Remove the stem end and the seeds. Pulse them into small pieces. Quarter the onions and pulse them too.
Add the salt to the vegetables in the bowl. Mix well. Place the bowl in the refrigerator overnight.

The next morning, rinse the vegetables under cold water well to remove some of the salt.
Note: Salting is not technically necessary, but gives the relish a better overall flavor.

Add the brine ingredients to a large stock pot.

Add the vegetables. Bring the mixture to a boil. Turn it down a bit, but continue at a boiling temperature for about 15-30 minutes, stirring occasionally, to cook the relish down.

Once the relish has the proper consistency, fill the jars with the relish, leaving a 1/2-inch headspace.

Remove air bubbles with a plastic or wooden tool.

Wipe off the jar rims with a damp paper towel to remove any food particles or sugar.
Get the canner water hot. Wash the jars and lids. Add the clean jars to the canning pot to heat. Once the jars are filled, add them to the canning pot. Bring the water in the pot to a boil. Once the water is boiling, set the timer.
When the processing time is complete, remove the pot from the heat, carefully open the lid, and partially lift it off the top of the canning pot. Let it rest like that for 5 minutes.
Then, remove the lid and let the jars rest in the canning pot for an additional 5 to 10 minutes.
After resting, remove the jars onto a kitchen towel placed on your counter and let them thoroughly cool for 12-24 hours, undisturbed. You may hear the lids pinging sometime in the next hour. This is music to a canner’s ears. It is due to the reaction of the lids being sealed to the jar.
Check the seals. Press down in the middle of the lid. If it flexes up or down, the jar is not sealed and should be refrigerated and used first.
Then, remove the bands. Gently pick up the jar by the lid to check the seal further. Again, if it is not sealed, use it first.
Label jars with contents and the date. Store in a cool, dark place for at least a year. Avoid areas with large temperature fluctuations.
Do not stack jars on top of each other. This can compromise the seals. If you run out of room on your shelf, use a sheet of cardboard or a thin piece of wood and place that on top of a row of jars. Then you can put jars on top of that. This will distribute the weight evenly.
Before using any canned goods, always inspect the packaging and the food itself. Make sure that it looks and smells as it should. If it doesn’t, it’s best to err on the side of caution and discard it.
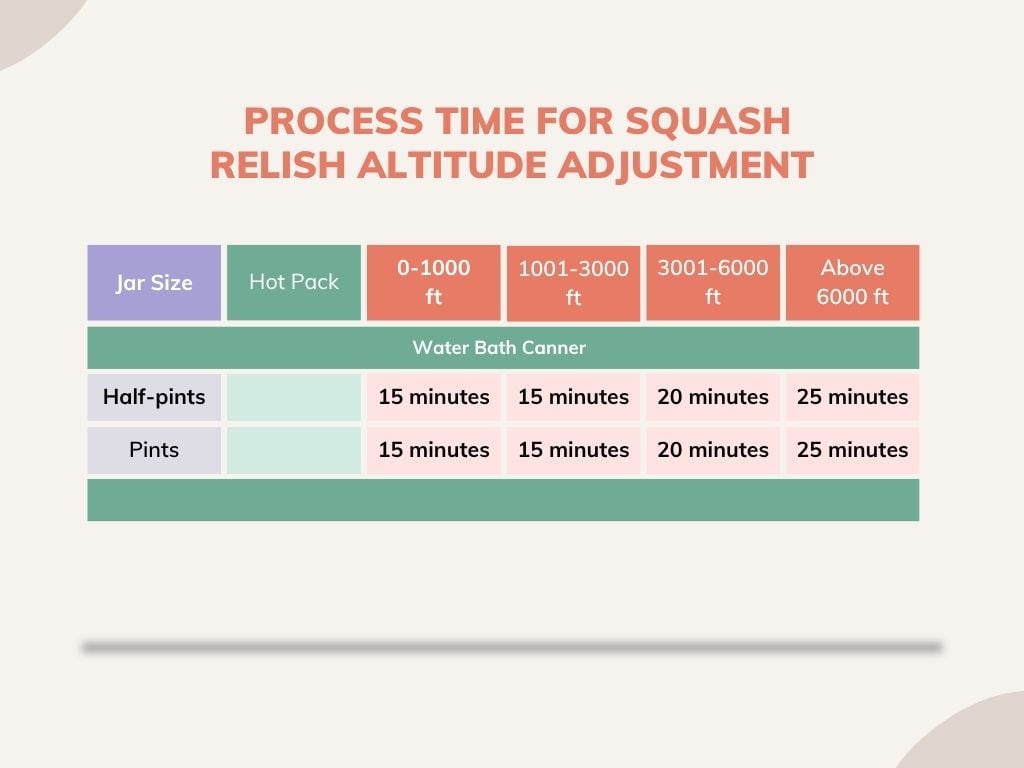
For water bath canning times at specific altitudes, see the chart below.
How to Store Home Canned Foods
Label jars with the name of the product and the date. Use the oldest products first. In other words, rotate products and put freshly canned items behind older items so the older jars can be used first.
Store the jars in a cool, dry place like a basement, pantry or cupboard. Avoid storing them in areas exposed to direct sunlight or high humidity, as this can cause the food to spoil.
Our ancestors stored canned goods in root cellars, which were basically holes in the ground deep enough to maintain a fairly constant temperature year-round. Food would not overheat and spoil in the summer and it did not freeze in the winter, making this a perfect place to store all kinds of food.
Use jars within the recommended time frame. Lids are guaranteed for one year or eighteen months if the package indicates that. Use lids within this time frame to ensure the food is safe.
When using a jar from your pantry shelves, always inspect it first. Don’t use the product if the jar or lid has been compromised. Any cracks or bulging lids mean to throw it away. Inspect the product after opening. If it looks or smells “off” discard it.
For most products, leftovers should be refrigerated and consumed within a few days. Condiments will last several months.

This super easy relish only requires about 20 minutes of hands-on time. It’s a delicious condiment to have in your pantry, and it’s a great way to use up lots of squash. You can use a combination of yellow squash and zucchini, but it won’t have the gorgeous yellow color this relish has.
More Easy Condiments
Tools That Make This Recipe Work
If you don’t already have these, this is where most people struggle
- Canning Tool Set – Makes lifting, filling, and handling hot jars safer and much easier.
- Canning Pot – Gives you the deep boiling-water bath needed to process the relish safely.
- Canning Lids – Create the airtight seal that keeps your finished squash relish shelf-stable.
- Pint Jars – Provide the proper size and shape for safely processing and storing your relish.
- Canning Bands – Keep the lids securely in place while the jars process and cool.
- Food Processor – Chops the squash and vegetables quickly and evenly without spending ages doing it by hand.

Keep this pot on hand for seasonal canning projects. It provides the depth needed for safe water bath canning and stores easily when the season is over.

Perfect for storing homemade squash relish, these quart-sized Mason jars help keep your batch fresh and organized. Durable glass makes them useful for water-bath canning, pantry storage, and preserving garden produce.

Squash Relish
Ingredients
For Brining
- 10 cups yellow squash
- 3 cups onions
- 4 red bell peppers
- 5 tablespoons Salt
For Relish
- 3 cups Sugar
- 3 cups apple cider vinegar or white vinegar, 5% acidity
- 1 teaspoon turmeric
- 1 teaspoon dry mustard
- 1 teaspoon Black Pepper
- 1 teaspoon celery seed
Instructions
For Brining
- Remove the blossom and stem end from the squash. If the squash is large, cut it in half and scrape out the seeds with a spoon. Then cut the halves into smaller pieces that fit into your food processor. Pulse the food processor until you have medium-fine chunks. We like a bit of texture, so not very fine, but no larger chunks either. (Think of the size of commercial relish pieces.) Do this in batches and place the chopped zucchini into a large non-reactive bowl.10 cups yellow squash
- Peel and quarter the onions. Pulse them in the food processor. Add them to the bowl with the zucchini. Cut the stem end off of the peppers. Deseed them and pulse them in the food processor, too. Add them to the bowl.3 cups onions, 4 red bell peppers
- Mix grated vegetables in a large bowl. Add salt. Let sit on counter or in refrigerator overnight. See important notes below!5 tablespoons Salt
For Relish
- Next morning, rinse the vegetable mixture well, with cold water, in a colander to remove some of the salt.
- Add to a large pot. Add remaining ingredients.3 cups Sugar, 3 cups apple cider vinegar or white vinegar, 5% acidity, 1 teaspoon turmeric, 1 teaspoon dry mustard, 1 teaspoon Black Pepper, 1 teaspoon celery seed
- Bring the mixture to a boil. Low boil it for about 30 minutes, until it is relish consistency.
- Pack and seal in hot jars. Refrigerate for at least 6 months.
- For longer storage, and to make shelf stable, process pint jars in water bath canning pot for 20 minutes, adjusting for elevation.
Canning Instructions
- Once the relish is at a good consistency, heat jars and start your boiling-water canner.
- Pack hot finished relish into hot jars.
- Remove air bubbles.
- Wipe rims of jars with damp paper towel to remove debris.
- Center warmed lid on jar. Screw on band fingertip tight.
- Process jars for 15 minutes, adjusting for altitude. (See notes below for altitude adjustment.


 See all of my favorite tools and gift ideas on my New Amazon Store!Check out Binky's Amazon Store!


